| Index | |||
|
||||||||||
| AnyZip offers you the convenience of using more than one way to create a new archive. These include creation through drag-and-drop, through the Windows Explorer and Wizard driven creation, the last of which requires AnyZip to be open for creating the archive. These methods of creating a new archive are all discussed in this section. Creation through Drag-and-Drop AnyZip supports standard Windows drag-and-drop features for creation of a new archive file. This allows you to create an archive without going through the steps in the Wizard driven creation or having to open AnyZip. It is a quick and easy method of creating an archive file. For doing this, you first need to have the AnyZip Main Window open. With the application open, resize the AnyZip window to a reasonable size, which allows you to view the window alongside the source directory. Drag-and-Drop the file to be added to the archive directly into the AnyZip empty window. In the Archive Path field of the resultant Add to Archive window, enter the name of the archive file and click on OK. You can also drag-and-drop multiple files into the archive. In order to select more than one file either Select All using the Windows shortcut or use the Ctrl+Select option to highlight and include only a limited number of files from a folder in an archive.
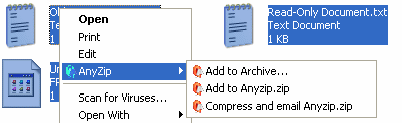
You can configure the remaining options in this screen as well. These are described in detail under the Add option of the Action Menu, which can be accessed by clicking here. Creation through Windows Explorer AnyZip also allows you to create archive files directly from the Windows Explorer. In order to do this you are required to enable the AnyZip Explorer Integration Options, details of which can be found here. In order to create a new archive from the Windows Explorer, select all the files that need to be included in the archive. With the files selected, right click to bring up the AnyZip Menu, either in the main menu or as a sub-menu, as shown below:
You can now choose any one of the three options listed here to create a new archive file. The options available are: [Add to Archive]: When you select this option, a new archive is created after you specify the name of the archive file, in the Add to Archive window that is displayed. [Add to AnyZip.zip]: AnyZip defaults the name of the archive based on the location of the files when you attempt to create an archive using this option. Please note that AnyZip.zip is only shown due to the fact that these files are in a directory named AnyZip, and it is not the default value. [Compress and email AnyZip.zip]: In addition to creating the archive file, you can also send it by email. When you select this option, AnyZip automatically creates a new mail with the archive file as an attachment. For more details on emailing archives, please click here Wizard Driven Creation You can use AnyZip Wizard or menu command [File | New Archive] to create a new archive. Click here for more information. |
||||||||||
| Copyright (C) 2001-2006 TurboSoft, Inc. | ||
| |
||