

TurboFTP Server can act as an SCP Server to provide SCP (Secure copy) service over the SSH2 layer. Because of the same underlying secure layer, SCP offers the same level of security as SFTP over SSH2. In terms of file transfer, SCP is technically faster because it requires no repetitive confirmation of data blocks like in SFTP. Also, SCP is ideal to be used in the script for batch file transfer, where it is more straightforward than SFTP.
Turbo FTP Server can run as an SCP Server for Windows while supporting the exact syntax of Linux/Unix SCP command with some subtle differences.
For example:
# Copy the file "myfile.txt" from a remote host to the local host

$ SCP joe@remotehost.com:myfile.txt /some/local/directory
# Copy the file "myfile.txt" from the local host to a remote host

$ SCP myfile.txt joe@remotehost.com:/some/remote/directory/
# Copy the directory "dir1" from the local host to a remote host's directory "dir"

$ SCP -r dir1 joe@remotehost.com:/some/remote/dir
Subtle differences of SCP syntax for TurboFTP SCP Server vs Linux/BSD:
- If the destination is a remote directory (e.g. '
newdir ' in the following examples), it should have an ending slash to eliminate ambiguity.
# not recommended

SCP -P 7222 *.jpg joe@remotehost.com:/newdir

# correct

SCP -P 7222 *.jpg joe@remotehost.com:/newdir/
# wrong, will return "illegal D msg 'D0755 0 testdir'" if 'newupdir' doesn't exist
$ SCP -P 7222 -r testdir/ joe@remotehost.com:/newupdir
# The following works, with local directory 'testdir' having an ending slash or not. # 'testdir' will be created at remote under 'newupdir'. However, 'newupdir' won't be created if it doesn't exist. # correct
$ SCP -P 7222 -r testdir/ joe@remotehost.com:/newupdir/
$ SCP -P 7222 -r testdir joe@remotehost.com:/newupdir/ - TurboFTP Server doesn't yet support regular expression wildcard.
Overview
TurboFTP Server is a multi-protocol secure file transfer server. SFTP and SCP are popular file transfer protocols that generally run on top of the SSH secure layer. When it comes to user authentication in SSH, public key authentication is considered more secure in that no password is sent over the network. TurboFTP Server supports SSH public key authentication in two different configurations. The first one is quite simple and similar to the OpenSSH server running on Linux: the server looks for the user's SSH public key in the ssh_key subfolder under the user's home folder. If a PEM format SSH public key exists, it will be loaded to authenticate the user (the ssh_key folder is hidden from the user's view then the user browses their home directory).
Alternatively, suppose Active Directory is the authentication method of a domain in TurboFTP Server, and you want to use SSH public key authentication for users to access SFTP/SCP service. In that case, the SSH public key needs to be stored as an Active Directory attribute. This guide assumes a valid AD user attribute sshPublicKey has been assigned to store the user SSH public key and shows how to configure TurboFTP Server and SFTP Client to make SSH public-key authentication work.
Mapping SSH public key to AD users
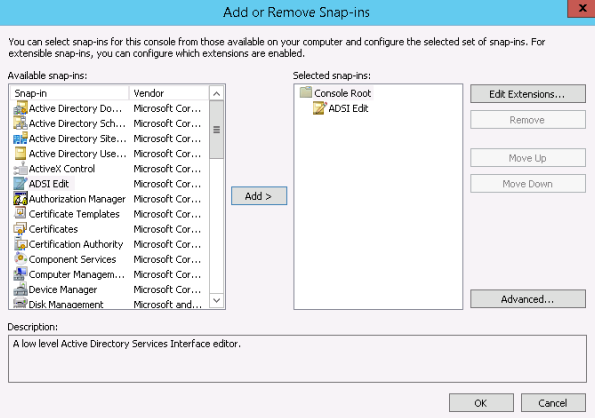
To map the SSH public key to an AD user, we need to use ADSI Edit.
-
Launch MMC and add ADSI Edit as a snap-in to MMC.
-
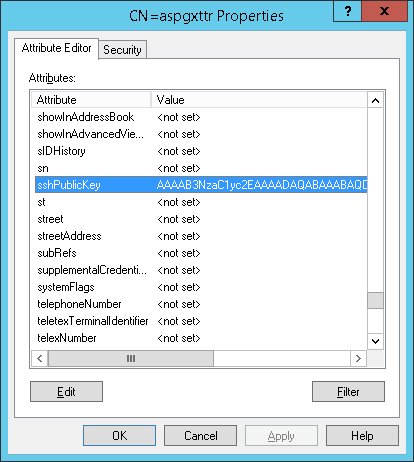
Search for the user in the tree, right-click on it and select Properties. All attributes can be edited there.
-
Select Attribute Editor, select sshPublicKey, and double-click on it. Copy and paste the user PEM format SSH public Key (only the Base64 key blob, excluding any delimiters or attributes) here and click OK.


Configure TurboFTP Server to use AD as an external authentication source
Please refer to the article Set up Active Directory or LDAP Authentication in TurboFTP Server for this procedure.
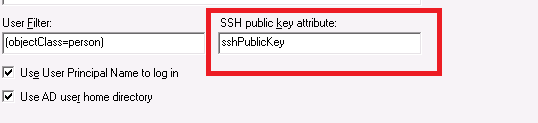
To enable SSH public key authentication, ensure to enter the name of the AD attribute where the user's public key is stored.
Configure SFTP Client for SSH public key authentication
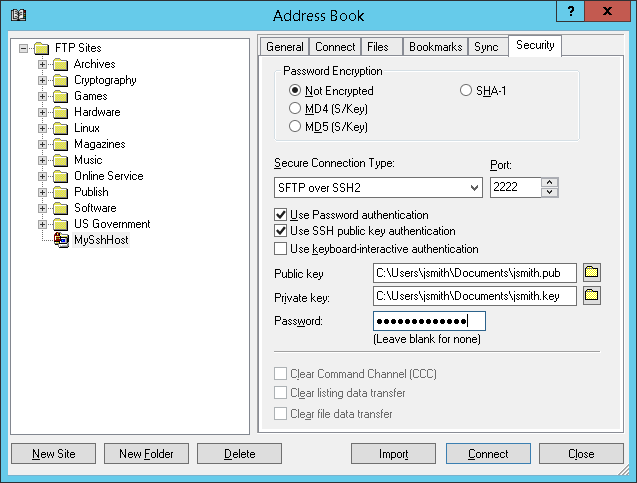
We demonstrate SFTP client configuration with the TurboFTP client.
-
Launch the TurboFTP client, and select the site to configure in Address Book.
-
Go to the Security tab and enable Use SSH public key authentication; provide the paths to the user's public and private keys.

Overview
TurboFTP Server allows you to quickly set up a file server to securely serve files through different protocols like HTTPS,
Impersonation configuration with Linux SAMBA share
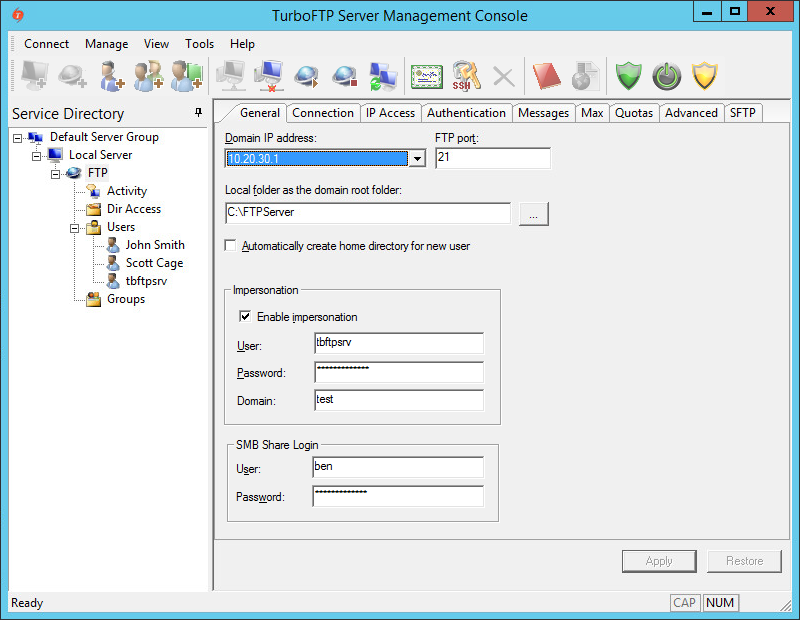
TurboFTP Server running on Windows must impersonate a logged-on user to access a network share. To do so, click on the domain in the left pane (FTP in this example), tick on Enable impersonation checkbox, and provide User, Password, and Domain. The impersonated user is an account that can log into the system where TurboFTP Server is running and requires no administrator privileges. It is also required to fill in the SMB Share Login credentials if the share is protected by username/password.
We demonstrate the configuration on Ubuntu 14.04 with an existing Linux user, 'ben'.
# install Samba service
sudo apt-get update
sudo apt-get install samba

# add a Samba user 'ben'
sudo smbpasswd -a ben

# create a folder to be used as the Samba share
mkdir /home/ben/sambashare

# modify smb.conf to allow share access
sudo vi /etc/samba/smb.conf (you might want to make a backup before modifying it)

# Add the following in the end of /etc/samba/smb.conf:
[sambashare]
comment = Samba on Ubuntu
path = /home/ben/sambashare
read only = no
browsable = yes

# Restart Samba service
sudo service smbd restart
In TurboFTP Server's Domain -> General tab, put Samba user 'ben' credentials into SMB Share Login. Then restart the domain. You can now test the network share access by populating the root or Virtual Folder in the Dir Access tab.
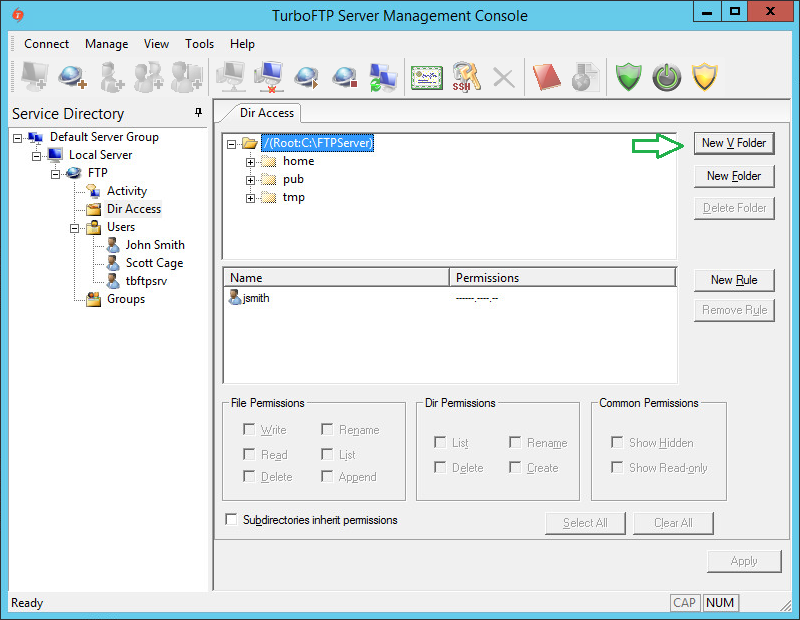
Configuring VFolder
-
To configure VFolder to use a network share, click on DirAccess in the left pane and then the New VFolder button.
-
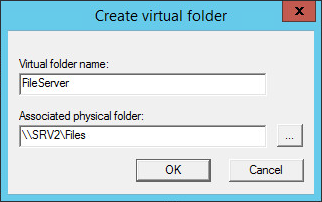
Provide Virtual Folder Name and Associated physical folder path.
-
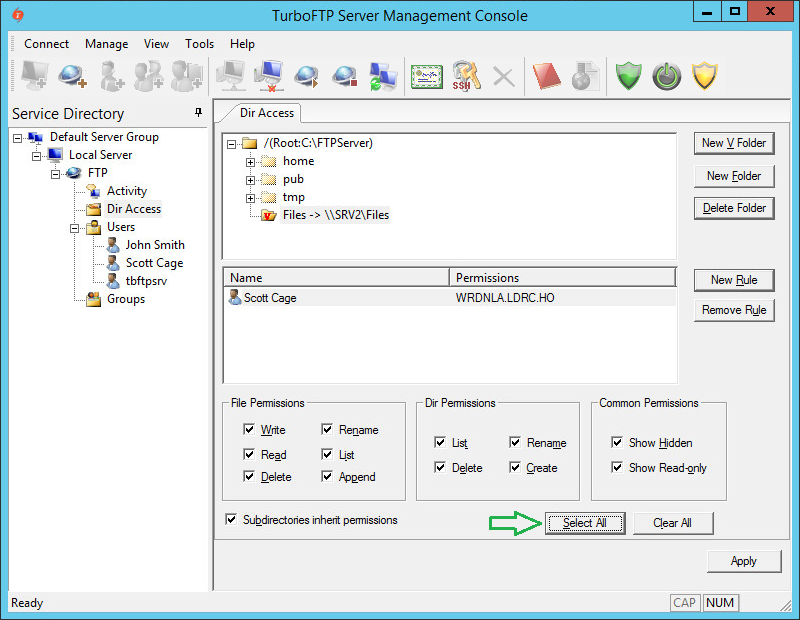
As we have permissions inheritance disabled at the root level, we need to add someone to the list of VFolder permissions.
To do so, click the newly created VFolder and then the Add Rule button.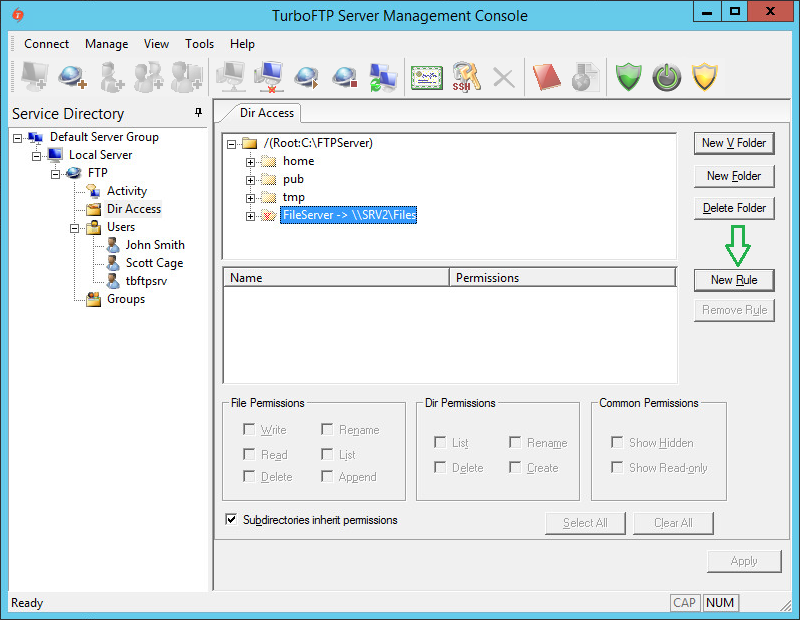
-
Select a user and click OK.
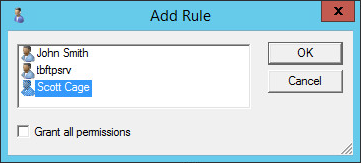
-
Click on the user again and press the Select All button to give him all permissions to the VFolder.
-
Save changes by pressing Apply button.


Configuring TurboFTP Client
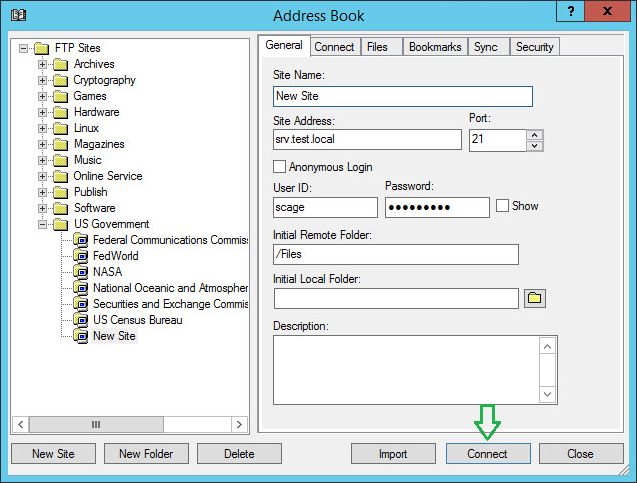
-
Open TurboFTP Client Address Book, select New Site -> Standard FTP, provide Site Name, Address, User ID, Password, and Initial Remote Folder, and click Connect.
-
You will be connected to the FTP server, and the Initial directory is set to Files, a network share on the file server.

- Overview
- Export RootCA certificate from CA console
- Import RootCA
- Create TurboFTP SSL Server certificate
- Configure TurboFTP Server to accept secure SSL connections
- Create and deploy user certificates
Overview
One of the approaches to strengthen the security of HTTPS/FTPS(secure FTP) server's logon process is to use SSL client certificate authentication. This step-by-step guide will show you how to configure Active Directory, TurboFTP Server, and Client to use certificates.
Export RootCA certificate from CA console
-
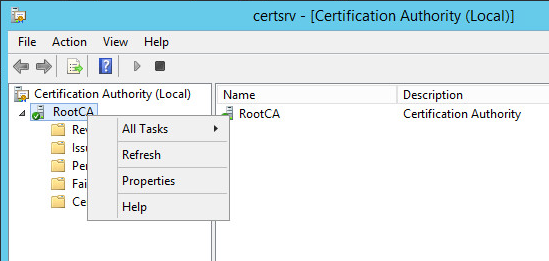
Open Active Directory Certification Authority console.

-
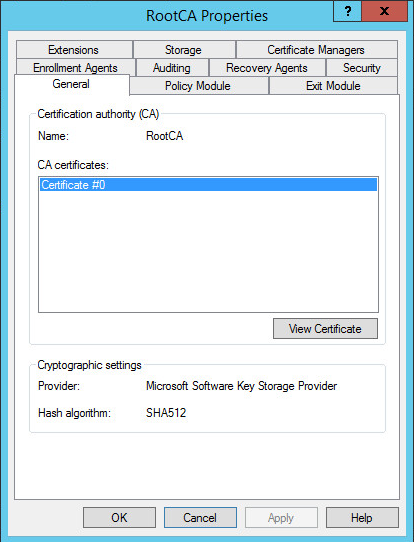
Right-click on the CA and choose Properties.
-
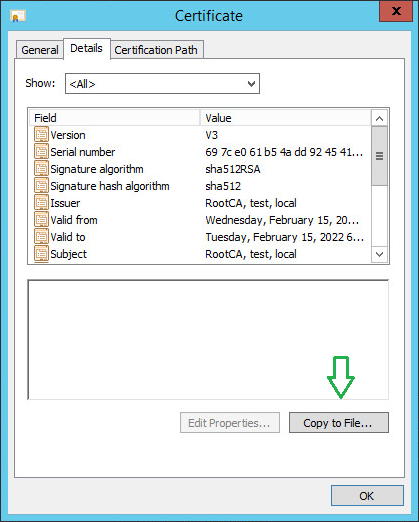
On the General tab, click View Certificate.
-
Click on Copy to File button.
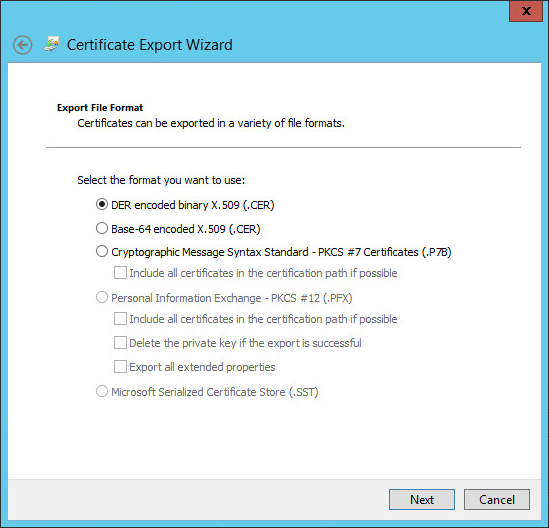
-
Leave the default file format and click Next.
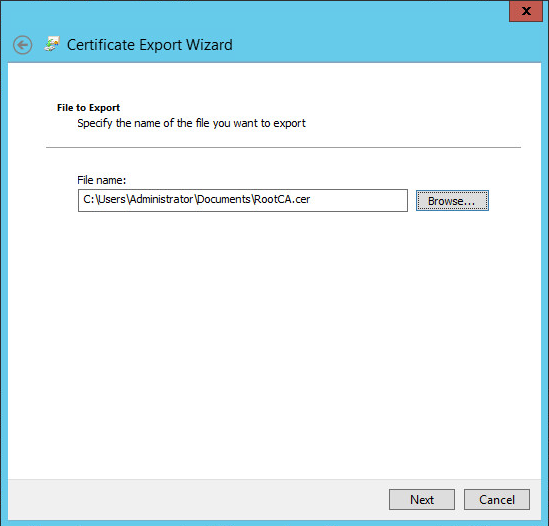
-
Click Browse and provide a path where to store the CA certificate.
-
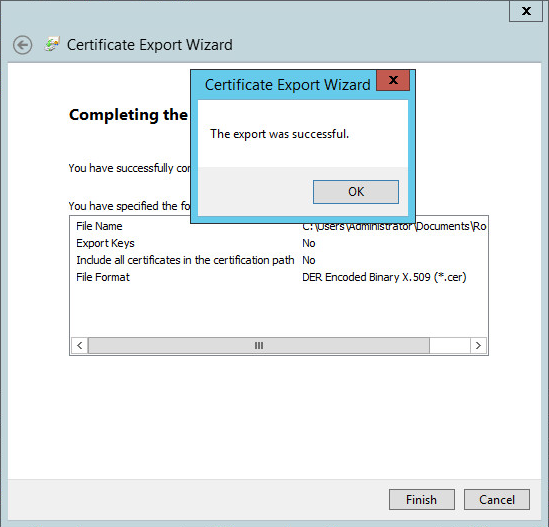
Click Next, and confirm your export operation. Once the certificate is exported, you will see an affirmative message.
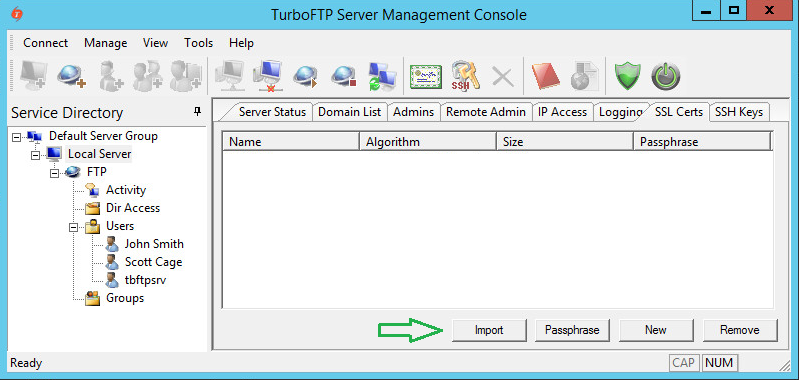
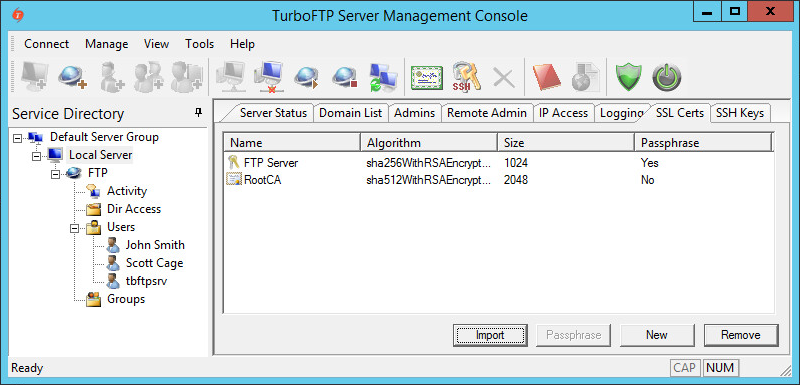
Import RootCA certificate to TurboFTP Server
-
In the TurboFTP Server management console, click on Local Server.
-
Switch to the SSL Certs tab and click Import.
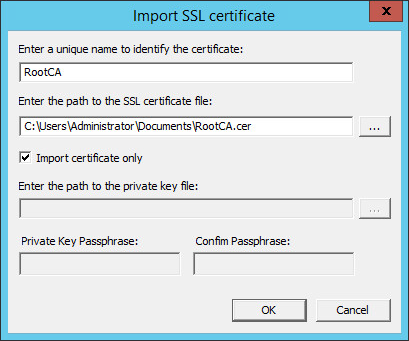
-
Provide a name and path to the certificate and click OK.
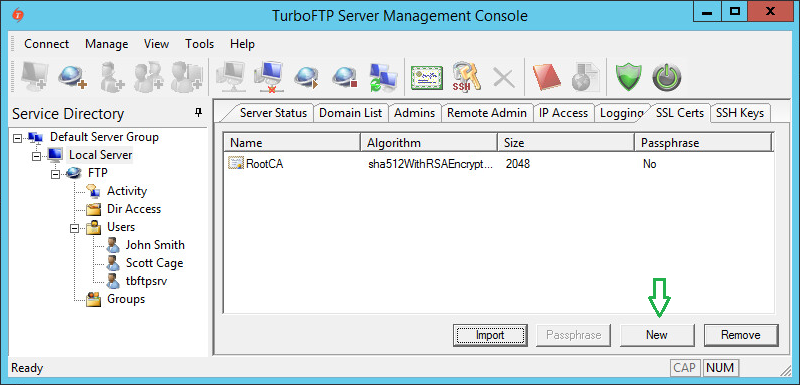
Create TurboFTP SSL Server certificate
-
Click on the New button to create an SSL certificate (on the server).
-
Provide certificate name and passphrase (other options can be left with default values).
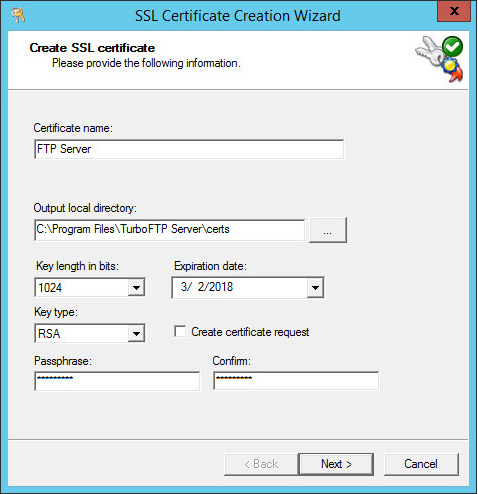
-
Provide Certificate Subject Information.
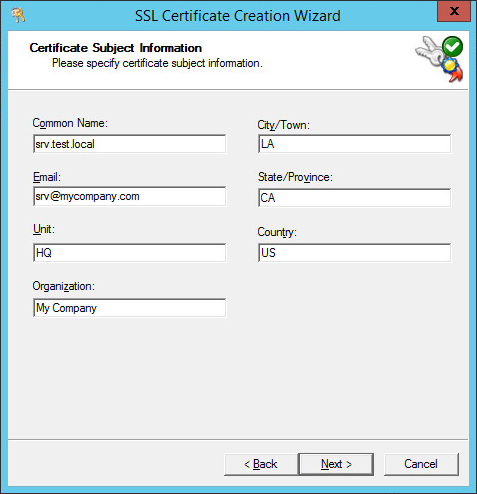
-
Click Next to generate a certificate.
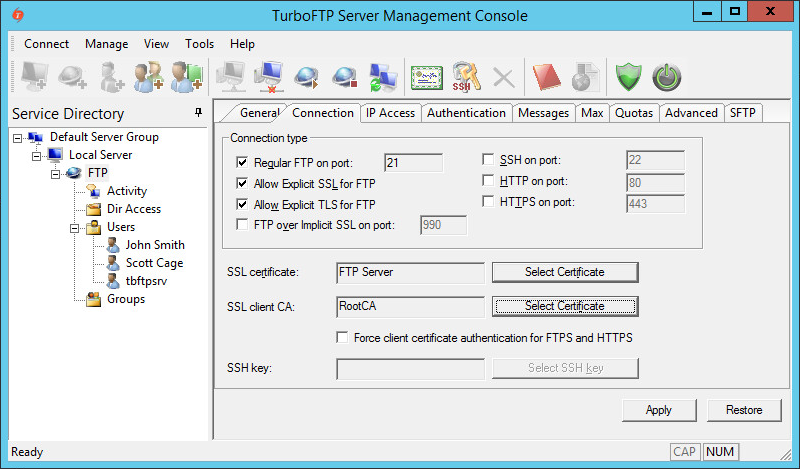
Configure TurboFTP Server to accept secure SSL connections
-
Click on FTP Server, go to Connection tab, Enable Allow Explicit SSL for FTP or Allow Explicit TLS for FTP check boxes and select appropriate certificates.
Configure TurboFTP Server to accept secure SSL connections
To automatically enroll clients for certificates in a Windows domain environment, use Group Policy certificates auto-enrollment by following the official guide from Microsoft.Please note this is only an example of setting up SSL client certificate authentication for users in TurboFTP Server. This authentication function is not limited to Active Directory users or bound to Windows Certification Authority. You can use a third-party CA certificate and create/distribute client certificates signed by the CA to users, who can be from any authentication source that TurboFTP Server supports.
Overview
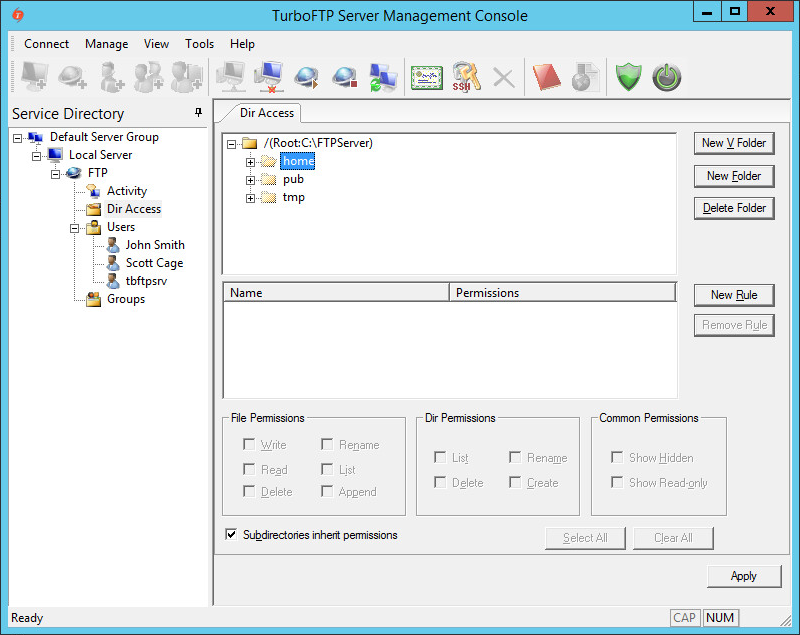
TurboFTP Server is a managed file transfer server supporting multiple secure file transfer protocols. For example, it runs as an FTPS and SFTP server combined, offering the services on different ports. We will now demonstrate how to configure Turbo FTP Server Dir Access, which will be applied to all active protocols. You can use a local folder or a network share as the root of the domain file system.
Directory Permissions
-
To give
a user access to the FTP root directory, click on the New Rule button.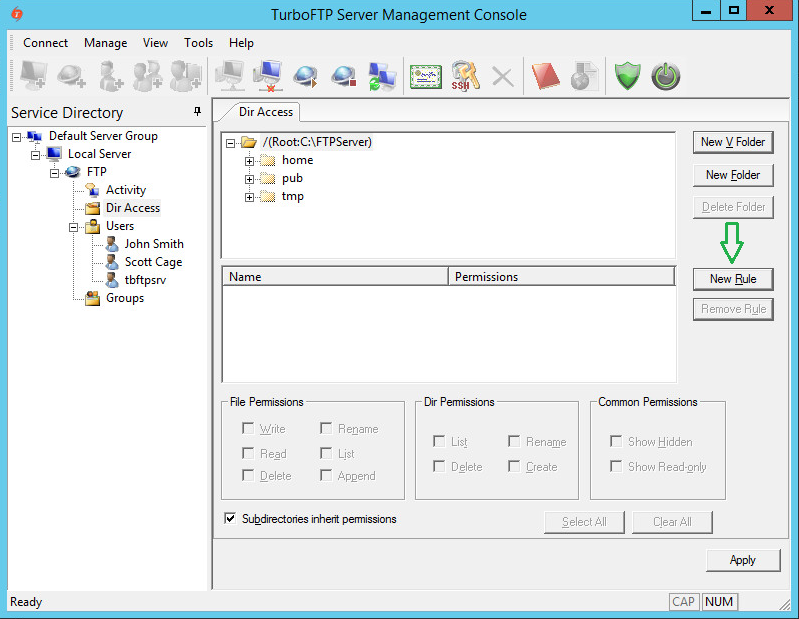
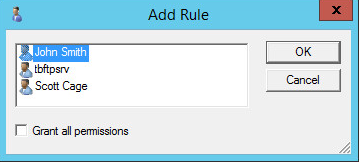
-
Select a user you want to give access to and click OK.
-
Click on the user to set his(her) permissions.
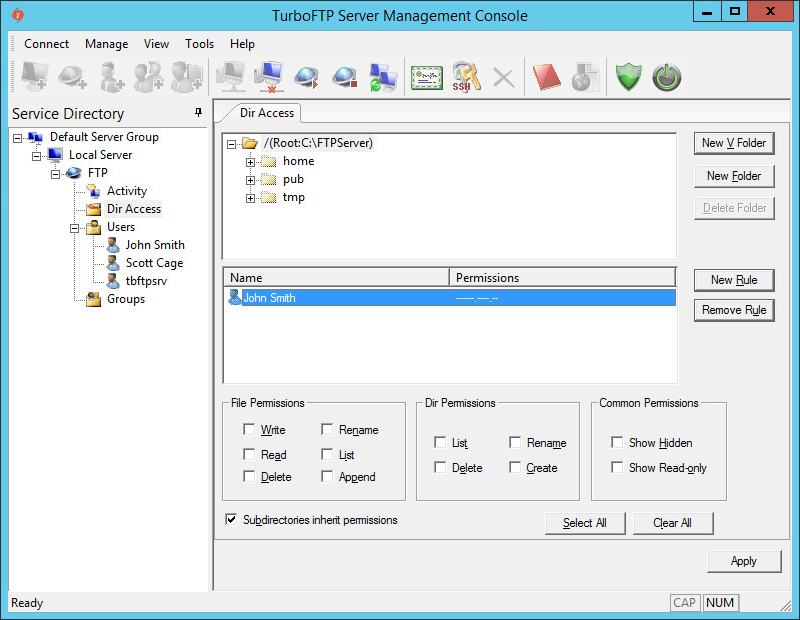
-
Please note that permissions are divided into three categories: File Permissions, Dir Permissions, and Common Permissions, which can be set using the checkboxes accordingly.


Permissions inheritance
-
Also, note that the "Subdirectories inherit permissions" checkbox is enabled by default. If this option is selected, all subfolders inherit the permissions of the current folder.
Otherwise, no permissions exist by default for any subfolder, and no user can access the contents of those subfolders unless specific rules have been added.
To demonstrate this, disable inheritance and click Apply.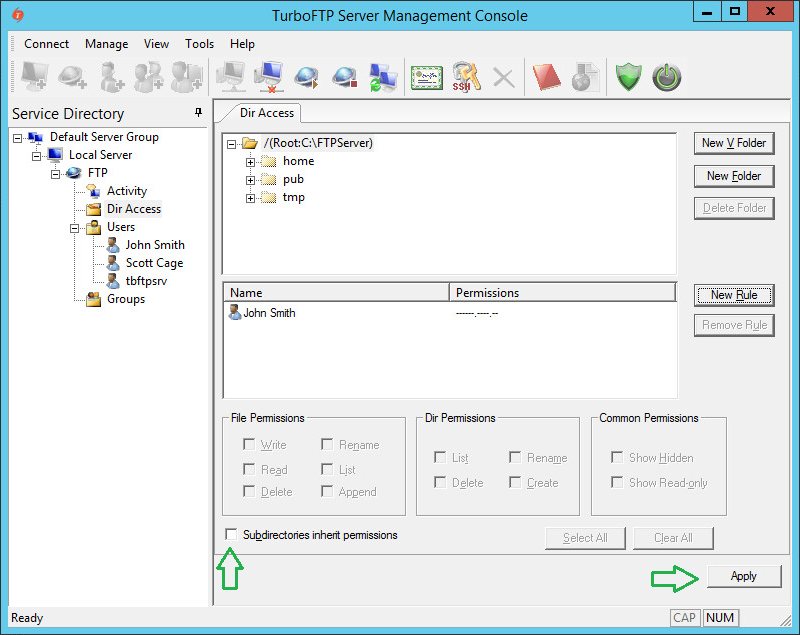
-
Click on any subfolder and notice that the access list isn't inherited. No access is granted to the subdirectory.
-
Suppose we want to allow users to access a subdirectory (for example, "home" in this example) where inherited permissions are disabled. In that case, we need to create a new rule, add required users, and set permissions.


Virtual Folders
-
The Virtual Folder allows you to add a link to any physical subfolder into the existing domain file system and make it appear as a subfolder under the domain root folder.
To create a new Virtual Folder, click on the New V Folder button and provide a name and the physical path.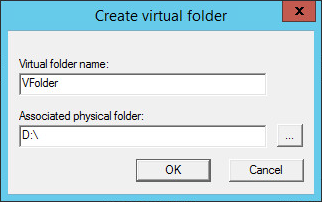
-
Once created Virtual Folder looks almost the same as usual, with a small note as a path to the physical folder location.
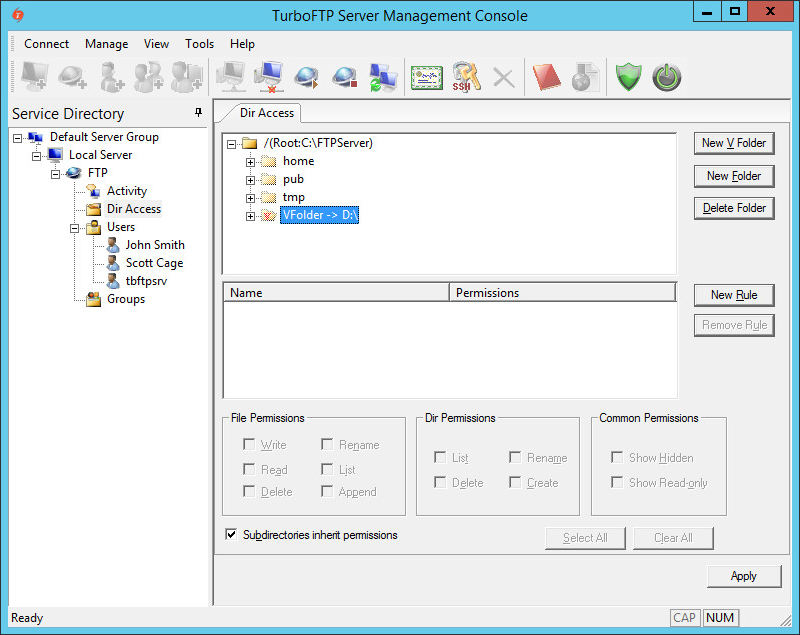
-
Permission manipulation of virtual folders works the same way as with a normal subfolder.
If you use the Delete Folder button to delete a Virtual Folder, only the reference will be deleted, and the physical folder it points to will remain intact.


Notes
Both File Permissions and Dir Permissions have "List" permission. If "List" is unchecked in File Permission, the folder shows no file in the listing; when "List" is unchecked in Dir Permission, the folder shows no subfolders.
AD/LDAP HomeDir option
If using AD/LDAP authentication, and "Use AD user home directory" or "Use LDAP user home directory" is enabled, the user will have FULL access to his/her home directory once logged on.